How To Print A T-shirt
It's easy to make your own t-shirts at home using only simple supplies from your local craft or art supply store. You'll need the following:
- A sheet of clear acetate or transparency film
- A sharp hobby knife
- Some masking tape or spray adhesive
- A jar of fabric ink in your choice of color
- A tray or plate to hold the ink
- A mini foam paint roller
- A blank t-shirt in your choice of color
- An iron
- A pillowcase
 The first step is to figure out what you want to print on your shirt. We'll be making a stencil, which means that your image can't have islands in it. That means text will be difficult to do, unless you want the
  look. If you're so inclined, you can easily draw your image directly onto the acetate. If you're not handy with a marker, you can print out your image and tape it to the bottom of the acetate. I'll be using this image of a ram's horn.
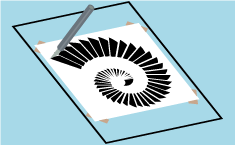 Next, begin cutting out your stencil. Don't worry if you accidentally cut through a connection. As long as the piece is still attached, it shouldn't matter. If you haven't had much experience doing this kind of fine cutting, remember that straight lines are your friend. You can even use a straightedge to cut against. Keep this in mind when designing your image. Also remember that whatever surface you're cutting on will get marred, so make sure you put a piece of cardboard or a cutting mat under your work.
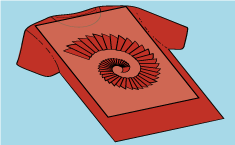 Now you'll need to affix your finished stencil to your blank shirt. You can tape down the corners, or better yet, use some spray adhesive on the back of the stencil. The adhesive is essential if you have lots of long peninsulas or delicate pieces in your stencil. We're now ready to roll on the ink! Remember that water-based fabric ink doesn't cover well on dark garments, so you might not get the results you expect with white ink on a black shirt.
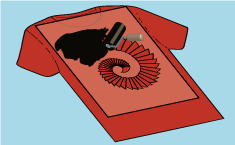 Pour a small amount of your ink into the tray. Run your roller through the ink a few times to soak it up. The smaller the roller, the less ink you'll waste. However, a bigger roller will be easier to print with. Now, carefully roll the ink over your stencil. Push down hard enough to get the ink into the fibers of the shirt, but light enough to leave some ink on the surface. If you use too much force, the ink can go through to the back of the shirt. If you use too much ink, it can bleed under the edges of your stencil. Spray adhesive helps stop bleeding.
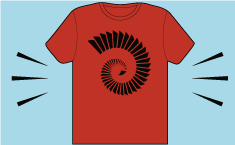 Peel away your stencil, and behold the results. You'll probably want to do several shirts at a time, both for practice and to get better yield out of your ink. Now you'll need to cure your ink. Follow the directions on the jar. Let it air-dry first, and then iron it on high heat. Put a pillowcase over the shirt so you don't iron the ink directly. Congratulations! You've printed a t-shirt. Wear it proudly.